Monday, June 13, 2011

Square Book/Map Wreath

So my new front door is my enemy! I really really dislike it! It has two windows in it so whoever comes up to the door can see right in! Discussion of what to do regarding those no-privacy windows just kept taking back burner to larger projects.
Until I had this strong crafty pull to make a wreath! I had this great 16x20 frame that I thought I'd put on one side of the door and then make another frame for the other side. And they'd help with visibility into the house from the sidewalk etc..
Here's my quickly painted and a few flowers and a "M' taped on frame.


Then I came across this blog and LOVED the look! so I attempted to duplicate :-)

Supplies
 Book and or Map you will be ok cutting up (I really wanted to use Charlotte's Web or a Dr Seuss, but couldn't make myself cup them up.. so I got a very interesting teen novel for $1 at Goodwill that I had no issues destroying!)
Cardboard- the sturdier the better (as you will see I learned the hard way)
Hot glue gun
Giant paper punch. Mine is 2in scalloped edge but kind of wish I would have gone with the 3in. Buy at JoAnns not Michaels!
a pencil
a piece of ribbon
box cutter

Step 1 Punch out book pages. I was able to get 6 punches per page and I did all 200some pages of the book (really only 100 because front and back..) Did not use all of them. You could probably get away with 50pages...

I did mostly book pages with some map cutouts too.


Traced the frame onto cardboard using a sharpie then cut it out with box cutter.


Step 2 Take pencil end and wrap punched paper around it to form a cup/flower.. whatever you think it looks like. I did a large group of them at a time then hot glued. You could probably glue right after this step but I thought making a ton of paper cups at a time was more time efficient.


Step 3 DON'T BURN YOUR FINGERS! (aka hot glue paper cups down.) I added in some of the maps.. basically just tried to cover all of the cardboard.
I attached a very small ribbon on the top and glued paper over it but so on the back I could thread different ribbon around that ribbon to hang it from... so I could switch out visible ribbon if needed..

And tada.......


(Oh and it's suppose to be a rocking horse, goes with the name of our street.. but Husband informed me couldn't see the bottom of it and "We're not THAT country to have a horse on our front door!")


So it lived there for awhile but what GREAT IDEA I had of the two wreaths (M frame inside and this one outside) did not work out.. They did NOT match up and I was going to need to paint the back of both wreaths! And we kind of have some crazy wind at our house so this poor flimsy cardboard wreath was not holding up to the "wild nature" of Southern Cali! Would work ALOT better to glue onto a frame! Then it could have stayed out front!

So I moved it inside and instead of taking the time and painting both backs to hang back on the door I found it a new home (for now)!
Hope you got inspired!

ENJOY!

Amazing Grilled Sandwiches!

Love Love Love Grill Season!!! (which is most of the time in Southern California) But there is something about those warm early summer days and firing up the grill!
We stumbled across the recipe while trying out the 'one vegetarian meal a week" idea.
Here's the originalrecipe from Allrecipes.com But of course we've changed things up a bit... :-)

Grilled Veggie Sandwiches

1 Red or Yellow or Orange Bell Pepper, cored and pulled apart into two halves
1 Zucchini, sliced longways
1 Yellow Squash, sliced longways
Half Red Onion, sliced
Mushrooms, if desired, either buttons sliced or Portabellas- they would make a pretty hearty huge sandwich
Loaf of Really Yummy Bread- (we normally go the focaccia route) sliced horizontally and vertically
Feta Cheese, crumbed
Pesto
Olive Oil for drizzling

Preheat grill to medium high.
Brush veggies and grill grate with oil. Place veggies on grill about 3min each side. Watch carefully though some may cook alot faster! (when I do mushrooms I do them inside in a saute pan and just saute with some garlic powder and pam spray)


(you can see the kids' ham and cheese side, but we did veggies
on their other side. Also added some parm cheese this time too!)

Place bread on cookie sheet. Spread both sides of bread with pesto. Pile on veggies (one side or both- sometimes hard to put together if on both sides) Top with feta. Pop them under the broiler for a few mins (could also put back on grill)


and ENJOY!!!

Tuesday, June 7, 2011

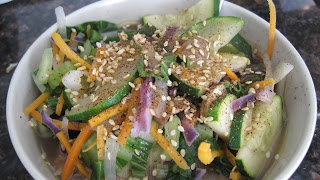
Sorta Soba Bowl

I really enjoyed watching Rachael Ray when I became a newly stay at home mom. She has such great recipes and understands the need to make a quick healthy meal. I don't get much time to watch her show now (Kids keep me too busy for that!) But we have some favorites of hers that we always come back to.

Sorta Soba Bowl
 Feeds 4-6 Adults

1lb of whole wheat spaghetti (we normally have a ton of leftover noodles but I freeze them or use them up         the following days)
2tbs vegetable oil- basically a few turns in the pan to help with sticking
1 onion diced
2+cloves of garlic-chopped
3 "handfuls" of store bought shredded carrots- I don't shredded my own carrots- more power to you if you do!
10ish shiitake mushrooms- thinly chopped
1 large zucchini, cut into half moons then sliced 1/2-inch thick
1 large bok choy or 3 baby boks- (remove middle part if using large bok choy) chop
6 cups of stock -chicken or veggie works

Topping
1/4cup toasted sesame seeds
1/2tbs ground coriander
1/2tbs chili powder
cayenne pepper- just a pinch depending on how spicy

Soy Sauce

Bring a large pot of water to a boil for the noodles. Once it boils add some salt and the noodles and cook until al dente- try not to overcook.


While water is boiling for noodles, swirl veg oil in a large soup pan/pot over medium heat. Add onion, garlic and carrots. Cook until onions start to get tender (4-5mins)

Add mushrooms, zucchini and bok choy- cook for another 2-3mins. Add stock and bring to a simmer for 5mins.

In a small bowl mix topping ingredients together- reserve for a garnish for soup.

Take cooked noodles and drain. Toss with a little veg oil and place in individual bowls. Drizzle some soy sauce over the noodles. Then pour veggie soup over noodles. Top with sesame seed topping.

For our little ones, I leave off the spicy topping and just sprinkle regular sesame seeds on theirs. I also serve it with forks and spoons for them. I, myself, use just a fork. We have left it vegetarian before but have also added shrimp and/or chicken to it. If chicken, I will marinate the chicken in some soyaki (from trader joes) or just some regular teriyaki sauce. Then bake in marinade and shred or dice cooked chicken and add into soup last minute.
Enjoy!

Monday, June 6, 2011

Bbq ribs!

Best ribs! Rub recipe makes a ton, but we normally make the whole rub then keep it on hand. Think its lasts us 3 times... So you could half or third it.
Takes some planning since it is best starting it the night before-though we've done it last min too.

2-3 racks of ribs-i like pork, we normally get them from costco.
1 cup bbq sauce

RUB
1tbs of each
Garlic powder
Onion powder
Salt
Dry mustard
Ground black pepper
1/2 cup paprika-normally thats a whole jar
1 cup brown sugar

Night BEFORE mix rub and apply all over ribs. Wrap in plastic wrap and put back in fridge.
Grill ribs indirect heat (or 350 oven) for 90 mins. I normally flip mine to get grill marks.
baste with bbq sauce-all sides and cook 30 mins longer. Again I'm a flipper..
Then slice up and enjoy! So yummy!
Published with Blogger-droid v1.6.9

Wednesday, April 27, 2011

ABC's of Me

ABC's of Me


A. Age: 27, though my older brother and I agree I act more like 31 than he does!

B. Bed size: Queen.. keep talking about a king, but who knows when..
C. Chore you hate: ALL!!
D. Dogs: Rex 1year old 80lbs husky/german shepard


E. Essential start to your day: Shower- I don't function well without one
F. Favorite color: Green
G. Gold or silver: silver
H. Height: 5’5”
I. Instruments you play: nothing really
J. Job title: stay at home mom, thanks to my wonderful husband!
K. Kids: 2 very strong willed little ones. Lil Mis 5 this summer and Lil Man almost 2.5
L. Live: In the sunshine- Southern California

M. Mom’s name: Minnette
N. Nicknames: Megs, Mommy
O. Overnight hospital stays: having babies and Lil Mis' open heart surgery (18 days!!)
P. Pet peeve: chewing gum, bragging about their kids nonstop (a little is fine here and there)

Q. Quote from a movie: no idea.?.. I'm on kid mode.. "BEST DAY EVER!"
R. Right or left handed: Right.
S. Siblings: older brother
T. Time you wake up: when the kids (or dog) wakes me up.. around 6:30 normally
U. Underwear: Yes... I wear underwear...
V. Vegetables you dislike: No.. not really.. I grew up in a home where artichokes, mushrooms, salads were the norm
W. What makes you run late: Kids.. always the kids..
X. X-Rays you’ve had: broken arm.. 5th grade maybe?!?!
Y. Yummy food you make: ALL! :-)
Z. Zoo – favorite animal: little tiny monkeys that are active while we're there.. love watching any animal play at the zoo. Polar Bears too, when they are out...
Well ENJOY getting to know me a little better...

Tuesday, April 26, 2011

Vegetable Id Posts

We finally got our garden planted! I am so excited to plant our garden in the ground this year! It's been in containers for the past 2 years and I am really hoping it just takes over out there.

I thought it would be cute to have little stakes that said which vegetables were what, especially since we started most from seeds. I had some craft popsicle sticks laying around, picked up a sharpie and some markers and wrote down what the veggies were. So proud of myself and then..... fast forward to when my husband watered the garden for the first time and sure enough my markers were not waterproof.. :-(

Did a little googling and found DIY: Garden Stakes. SOOO CUTE!!!

It was a project I did outside while the kids were playing. They even came over and helped with the first coat of paint.
These were my colors.. really wanted yellow but didn't have enough

You can tell that the Lowe's side was hard to cover- but it's only on one side.
She says to use a paint pen to write the types.. Had no idea what a paint pen was or where to find it, but they are locked up at Michaels.. sharpie brand is what I picked up- also called a poster pen. Just FYI..

There's my little basil plant!

Say What?!

I don't know about you, but every time a holiday comes up I google to find a new recipe geared towards that holiday. So we had just moved into our new house and St Patricks Day approaching fast. We decided not to really celebrate since we had so much going on. But let me tell you, this holiday is one of my husband's favorite! He's a huge corned beef fan!

St Patty's Day morning I searched stores trying to find a corned beef and a place that had cabbage left! Finally found both! Already had russet potatoes at home and figured kids would enjoy mashed better than in the pot with corned beef.

Searching AllRecipies I found a group of recipes called "colcannon". Had no idea what it was, but it said that it's traditional Irish side dish.. that sold me.. plus I already had everything on hand!! So tried it out and the kids devoured it!! LOVED IT!! Best part is, it has "hidden" vegetables in it! Tried to keep the fat low and opted out the bacon.

Menke's Colcannon
2 1/2 lbs of potatoes
1/2 of a head of cabbage- finely chopped
1 onion chopped
large handful of shredded carrots
1/4cup milk
1/4cup blue cheese dressing (if not a blue cheese fan sub in more milk)
1 tbs of butter
salt and pepper to taste

So basically you are making mashed potatoes. Bring a pot of water to boil and add the potatoes. Boil until tender.

In a saute pan pour a swirl of olive oil, heat to medium high. Add in cabbage, onion, carrots. Saute until cabbage is soft.


Drain potatoes and mash with milk, dressing, and butter. Then add in cabbage mix and salt and pepper to taste.

ENJOY!

Potato Leek Soup!

Oh how I love Potato Leek Soup! It's in my top 5 for comfort food! I came across THIS recipe and it's my base for the soup.
A few tips for cooking with leeks. First, sometimes they are found in the organic section only. (this is where they are at Henry's.)

This is what they look like


You place chopped, diced leeks in a BIG bowl of cold water. Swish it around. They are really dirty and this is the best way to wash them.

See all that dirt left!


Potato Leek Soup
2 Leeks- sliced
2 cloves of minced garlic
4-cups of broth- I use chicken, vegetable could be used too
1TBS of cornstarch
4 cups of peeled and diced potatoes
1 cup half n half
1 cup milk (or cream- depending on how low in fat you want your soup)
1 package of diced pancetta
Salt, pepper, and paprika to taste
Olive Oil

First add a swirl of olive oil to a large skillet. Heat that to medium. Add in the sliced leeks and garlic and saute until leeks are tender.

Pour broth into a large pot and add cornstarch before turning on the heat. Add potatoes and then turn on heat to medium high. Add leeks to broth. Bring to a light boil.

In the saute pan you used for leeks, dump in the pancetta and brown slightly to your desired crispness.


I like to put my pancetta on a paper towel after to soak up some of the fat/oil.

Then put it in the pot with potatoes and leeks. Boil until potatoes are done. About 30mins from when pot started boiling, depending on your size of diced potatoes.

Add milk and half n half. Then ENJOY!

Tuesday, March 15, 2011

Pancakes!!!

There is nothing that my 4 year old loves more than breakfast foods! Pancakes, scrabbled eggs, waffles, crepes.. Always asks for breakfast for dinner! So I had some energy this morning and figured why not make a double batch of pancakes and freeze some so we have them for later!
When we make pancakes and really any other 'baking" we add applesauce instead of oil or butter. This morning the only applesauce I had in the house was a gogo squeezer. Apple Peach.. hey why not try it! There was even a little left over for the Little Man to eat.


If you haven't seen these before, they are just what they say they are "applesauce on the go" NO spoons needed! We started little man on these pouches that we found at Babies R Us. A different brand has all sorts of baby food puree in the pouches. Now that the kids are older I try to keep some applesauce ones around. We find these at Henry's, Trader Joe's has applesauce and apple carrot ones that both kids like.

Ok, back to pancakes. Whenever I use applesauce I always add a dash or two of cinnamon, just think it goes nicely with it and I normally add a splash of vanilla too. :-)

Applesauce Pancakes

2 cups flour
2 tbs sugar
2 teaspoon baking powder
1 teaspoon baking soda
1/2 teaspoon salt
2 cups milk
2 eggs
1/4 cup of applesauce
dash of cinnamon
splash of vanilla

Mix dry ingredients together (flour, sugar, baking powder, baking soda, salt, cinnamon) Then in a separate bowl mix rest of ingredients together. Then add wet ingredients to dry ingredients. If you have time let the mixture rest in the fridge for up to 30mins. It helps make them fluffier. I did not wait this morning.. :-)

Lightly spray skillet and heat to medium high. Pour 1/4 cup of mixture into pan. Flip once bubbles pop on the top side.


This makes 18-20 1/4cup pancakes. I freeze mine in 5 pancake batches because that's what we eat on weekday mornings. I just put them in freezer ziploc bags.

Enjoy!

Before And After

Here are some of our before and afters on our new house.

Let's start with the Kitchen of course!
Before- Viewing what island would look like!!
After- still more is planned.. thinking of new color of cabinets!

This is the Family Room Before
Notice carpet and brick hearth

During...


After Fireplace


Lil Miss's room- Wanted pink! Was able to convience her of one pink wall and the others green. Pink and green are best friends, you know!?


Little Man's room- Music themed! Not finished yet but good enough for awhile!


So that's the new place for now! There's been lots of painting and lots of fixing things inside, so the outside needs some tlc next!!

Getting Settled

Oh the joys of moving! Takes forever to pack things up and then just as long (if not longer) to unpack! Moving also means eating take out and super fast already prepared meals! We tried our best to stay semi healthy while moving but didn't always work out that way.
It's a month after closing and we are getting settled. Pictures are going up on walls and stuff is finding it's permanent home. Meals are also coming together. The kitchen is put together enough to actually want to cook a full meal and try new meals even!
Check out our beautiful new island!!

Last night's dinner...

Maui Maui with Pineapple Apple Salsa

3 maui maui fish fillets- Any white fish will work (We normally split a fillet between the two kids)
Pineapple- We used half of a fresh pineapple diced small- You could use a large can of pineapple chunks if needed
Half an apple diced small
handful of cilantro chopped
lime juice from half a lime- we only had the fake lime juice last night so just a few squirts (if you use a real lime and not the fake stuff in the plastic lime bottle, squirt the other half of lime over the fish before baking)
salt
pepper
paprika
red pepper flakes (didn't add this to the kids' fish fillet but did to the adults)

Preheat oven to 350. Place fish in sprayed baking dish. Sprinkle with salt, pepper, paprika, and optional red pepper flakes and lime juice. Bake for 10mins and check. Continue baking until forks easily. Ours took 20mins but they were thick and still slightly frozen.

Mix pineapple, apple, cilantro and lime juice in bowl. Let it sit until ready to serve (can be made a day before and store in fridge)

Place cooked fish on plate and top with salsa. Enjoy!
Can't wait for more cilantro meals!!!

Tuesday, January 18, 2011

Not Your Vegan's Tofu

Oh Tofu.. I have nightmares of eating "scrambled eggs" made from tofu as a kid at my Grandparent's house. I'm pretty sure they even added it to pies! I told my little self that when I get older and make my own food, it will NOT be tofu!
But then my brother decided he'd make life a little more interesting and become a vegan. Yes, a vegan... no animal anything! Not even leather clothing! And tofu was reintroduced to me at an older age. And then I got married and introduced it to my husband and now my children. I am still very leary of this spongy-like protein. It's just strange and honestly most of the time lacks flavor. So why am I posting a tofu recipe.. well because it's GREAT ONE! Full of flavor, veggies, great with rice and dare I say, egg rolls.. Oh and did I mention there's beef in the recipe?! WHAT?!?! Beef and tofu together! Try it! It might change the way you feel about these odd little bricks.


Spicy Tofu Stir Fry

16oz firm or extra firm tofu
1lb ground beef
1clove/1tsp minced garlic
1tsp minced ginger (from the jar)
1 bag of stir fry veggies OR keep it simple and just do 1cup frozen peas
1/2cup general tsao stir fry sauce (From Trader Joe's)
1tbsp soy sauce
1tsp sesame oil
2 green onions sliced

Heat a large skillet pan or wok to medium. Brown the ground beef.

While the beef is cooking take out the tofu from the package. Lay it on a few paper towels. It's helpful to slice it long ways before putting on paper towels. Then place a few more paper towels on the top of the tofu. Press down on the tofu to help get the extra moisture out of it. You can always place an empty pan or something else heavy on top of the tofu and keep it there until ready to dice it.

Once the beef is brown put in the garlic and ginger. Stir that around a little bit, then put in your veggies. Stir fry them until they are just slightly crunchy.
Dice the tofu into little squares. Add them to the pan. Then pour in the sauce, soy sauce, sesame oil. I try to pour most of the sauce on the tofu- not sure if that really helps or not. Cook for 2 minutes or so until tofu is warm! Serve over rice, if desired, and top with green onions.


The 1/2cup of sauce is not too spicy for my kids especially with all of the veggies in it. My husband and I add extra sauce to ours once on the plate to get a little more heat!

Enjoy! And let me know if you are brave enough to try tofu for the first time! Would love to hear what people say about this recipe!


Sunday, January 9, 2011

Comfort Soup

It seems as though my kids can't stay well this year! It's one cold after another, croup, stomach bugs.. Just when everyone is snot free and we have a few days to play one of them catches something and we're back at being stuck at home.. waiting it out..
So a staple in our house this "winter" has been soups. I remember my friends talking about just throwing soups together out of whatever they had on hand! This blew my mind! I was in such awe of them! Then tried it a few times and it really is so easy!
We normally make our own broth. We made a ton from our turkey from Thanksgiving! Just froze it and then pull it out when needed. We had a huge turkey this year and had a TON of leftovers. So we have little baggies of that frozen too. But this wonderful comfort soup can be made with whatever you have on hand! That's the wonderfulness of it!! Plus there are no measurements, just some pouring and shaking!

Here is how I usually make mine (now that I am an expert and all!)

Broth- normally chicken or turkey- Probably the same amount as a box of broth from store (easy to keep those on hand too)
Meat- again normally turkey or chicken leftovers, cut up
2-3 carrots- diced very small
1/4 of an onion- diced very small
2 cloves of garlic
Pasta, I love using the mini pasta or breaking up spaghetti noodles really small too
a handful of frozen peas
a potato- peeled & diced small
a few dashes of paprika
dashes of dried basil and oregano (my little guy has texture issues with these in his soup so I leave them out now)
and that's my normal comfort soup... Again it all depends what I have on hand. I've thrown in beans, bell peppers, celery, broccoli.. the combinations are endless. We always add saltine crackers to ours and if we have it on hand some chopped cilantro too. Toppings are just as endless as what goes inside the soup! And buy making your own broth or buying the low sodium you can monitor your salt intake too!

Thursday, January 6, 2011

Yogurt Muffins


I absolutely LOVE to bake! Not saying I'm talented or anything, just love it! Muffins, cookies, cakes.. love it! I really do enjoy throwing together super yummy muffins. They don't always turn out super yummy but these always seem to turn out great!


When you bake low fat things you try to stay away from butter and certain oils (depending) Two of the best substitutes for oil/butter in baked goods are mashed bananas and applesauce. I notice that mashed bananas sometimes don't keep the item as moist as I'd like it. I normally always use applesauce- I sometimes split the oil called for in half and then add half applesauce half oil.. I was out of applesauce last night so this batch of muffins were made with the Smart Balance canola oil. I made blueberry muffins last night. You can choose any flavor combo you wish. I've done fresh strawberries with banana yogurt! I think a cranberry orange would be really good! (orange yogurt with added dried cranberries!)


Yogurt Muffins

2cups flour
1/2cup white sugar
1/2 cup brown sugar (love adding both white and brown sugar in baked goods!)
1t baking soda
1t baking powder
8oz yogurt (I only had 6oz yogurt so I added 2 oz of milk to make it moist enough to mix)
1 egg
1t vanilla
4tb oil or applesauce
2tb lowfat milk (add more if needed to mix dry ingredients)
2cups fresh fruit -chopped if needed

Topping

1/3 cup brown sugar
2tb flour
1/8t cinnamon (or a few shakes)
1tb soft butter (it is needed sometimes!)


Preheat to 350

Mix together flour, sugars, baking soda, baking powder. In separate bowl mix together yogurt, egg, vanilla, oil, milk. Then add dry ingredients to wet ingredients- Mix then add fruit at the end.

Mix topping ingredients into separate bowl. Use a knife to cut the butter so it blends with the dry ingredients.
Pour into cupcake liners 3/4 way full. Top with a little of the topping. Check after 20mins. Insert toothpick, when it comes out clean they are done!

Mine made a little over 12 muffins last night. I went ahead and baked 12 muffins then instead of baking a few extra, maybe 2-3, I lined a mini cupcake pan and added two drops of orange extract to the leftover mix and baked the little ones with orange flavoring! SO yummy!! I cooked the mini's for about 10mins. Think 12 would probably be perfect. Next time I will make the whole batch with the orange extract. Probably still keep it at a few drops of the extract for a whole batch.

Try them out and let me know what combos your family loves. We've already eaten way too many of them this morning!!
Enjoy!

Tuesday, January 4, 2011

Healthy Descions 2011!

Well last night was one of those dinner nights where I was so excited to try a new recipe from my new cookbook "Quick and Easy Cookbook" from the American Heart Association, but of course we were out of the house way past dinner time. And you find yourself contemplating stopping at a certain pizza place and not making dinner. But thanks to the new year and our pack to feed the kids healthy foods we ventured home to make dinner- Kids screaming in the car and all!
I had already planned on making these oven baked fish nuggets and some cauliflower to go along with it. The plan was to stop at the store for the ingredients we didn't have on hand but of course figured there wasn't time for that before major meltdowns! Figured I'd give them a try anyway. (Explain my adjustments along the way- but will type the original recipe)

Crispy Cereal Fish Nuggets

1lb white fish fillets (I used Maui Maui from Trader Joe's that was already cut up)
1egg
2tb skim milk (we keep 2% in our house)
1/4cup Parmesan cheese (we did not have.. so sad :-( Think this would have made them great! Any shredded cheese would be good I think..)
1/4cup cornflake crumbs or bread crumbs or panko
1/2t paprika- I used about 1full teaspoon because I ended up with more cornflakes.
A few shakes of garlic powder, onion powder, and dried basil- I add these to almost every recipe I make!

Preheat oven to 450.

Rinse fish and pat dry. Cut fish into bite-size pieces. I notice kids eat smaller pieces better than larger ones, so I always try to keep theirs small.

Beat together egg and milk in a shallow bowl.

Toss cheese, crumbs, and seasonings into ziploc bag.

Coat the fish in the egg mixture until well coated. Take out a few pieces at a time and toss it in the bag with the crumb mixture. Pull them out with a fork and lay them on an oiled or foil lined baking sheet. Then repeat until all fish is coated in crumb mixture.

Bake in oven- check it every 5minutes. Mine took almost 15 last night due to some of the larger pieces I had. But the small pieces I used for the kids were done at the 5min mark.

The recipe comes with a Lemon Tartar Sauce- I didn't make due to lack of ingredients, but am looking forward to making it next time.

1/2cup of fat free mayo
2tb finely chopped dill pickle
1t lemon juice
1t grated lemon peel

Mix together and keep in fridge until ready to serve fish.

(Nutrient Analysis- per serving. Calories 191kcal, Protein 26g, Carbs 14g, Cholesterol 64mg, Sodium 739mg, Total fat 3g (saturated fat 1g, poly 1g, mono 1g) )

Feel good starting the New Year off without stopping at a certain pizza place! It wasn't the most put together meal and between steamed cauliflower and mashed potatoes it looked a little blah on the plate but it tasted good, was healthy and the kids ate it!

Enjoy!

Monday, January 3, 2011

I'm Back!

Well it's been over a year! Little guy is older now and I think 2011 is a better time than ever to try this blogging thing again. (so hard with two under 4 running around!)
We are in the process of buying a house and between keeping up with my kiddos, still trying to make sure the fam eats healthy- let's throw home improvement into the CHAOS! We have a few weeks left until the house is officially ours! The list of DIY projects keeps getting longer and longer. Time will tell on what we actually attempt to do ourselves and what gets hired out.
So excited for what this new year will bring my family!
Feel free to join the journey with us!